
Smart thermostat installation is one of the easiest ways to upgrade your home’s comfort and energy efficiency. If you’ve been watching your energy bills climb month after month, you’re not alone! More people are now spending more on their energy costs while at the same time hoping to automate their houses with technological advancements. The smart thermostats have proven to be among the top home automation gadgets that are being used by homeowners in 2026.
In spite of the high popularity of the smart thermostats, many are afraid of installing them since they believe that it requires some technical knowledge. However, most of these new devices come with easy DIY instructions that can easily guide the homeowners.
No matter whether you choose Honeywell T9, Ecobee Smart Thermostat, or Google Nest Learning Thermostat, the installation process is similar to all three of them. As long as you prepare properly, have appropriate equipment at hand, and are safe throughout the whole procedure, almost any homeowner should be able to install a smart thermostat within an hour.
Having looked into the popular smart thermostats and ways to install them, we found that the key to proper installation is to correctly identify and mark thermostat wires before removing them from the wall.
This guide will help you with all the steps needed to install a smart thermostat in your home including making sure it’s compatible and even connecting your thermostat to your Wi-Fi network at home. You will feel confident about upgrading your home heating and cooling system once you are done with this guide.
Before installing, it’s important to choose the right device. Check our complete guide on best smart thermostat 2026 to find the perfect model for your home.
Table of Contents
What Is a Smart Thermostat?
A smart thermostat is a wireless device that manages your home heating and cooling systems in an intelligent manner that surpasses those offered by ordinary thermostats. Contrary to programmable thermostats which were common in the past, a smart thermostat connects to your internet and can be controlled from your mobile phone.
The most important difference between the two kinds of thermostats is the ability of the former to learn and be connected. While in the case of ordinary thermostats, you will have to set the temperature on the device itself, smart thermostats learn from your usage pattern, adjust themselves accordingly and are accessible from anywhere around the globe.
Smart thermostats today come with all sorts of features that make them very useful:
- Wi-Fi Control: Control the temperature in your house from afar using special mobile applications
- Automation: Set up personalized schedules which adjust the temperature automatically
- App Integration: Work with other smart home appliances and platforms
- Learning Capabilities: Most of the products learn your behavior patterns and adjust themselves
- Energy Reports: Monitor your behavior and get recommendations on how to reduce your electricity consumption
- Voice Control: Compatibility with Amazon Alexa, Google Assistant, and Apple HomeKit
All those components combined help to achieve a much more efficient climate control system in your house without any manual changes from your side.
learn more about smart thermostats
Benefits of Installing a Smart Thermostat
A smart thermostat may help in improving the level of comfort, decrease the consumption of energy, and make temperature control more convenient. It is reported by many people that their bills for heating and cooling became lower due to such options as smart scheduling and automatic temperature regulation.
With remote management using a smartphone app, you will be able to control temperatures wherever you are. Also, there is an option to connect your device to a voice assistant. Moreover, many of these devices feature the geofencing technology.
Besides, these thermostats give information about the consumption of energy and maintenance alerts.
Tools & Requirements
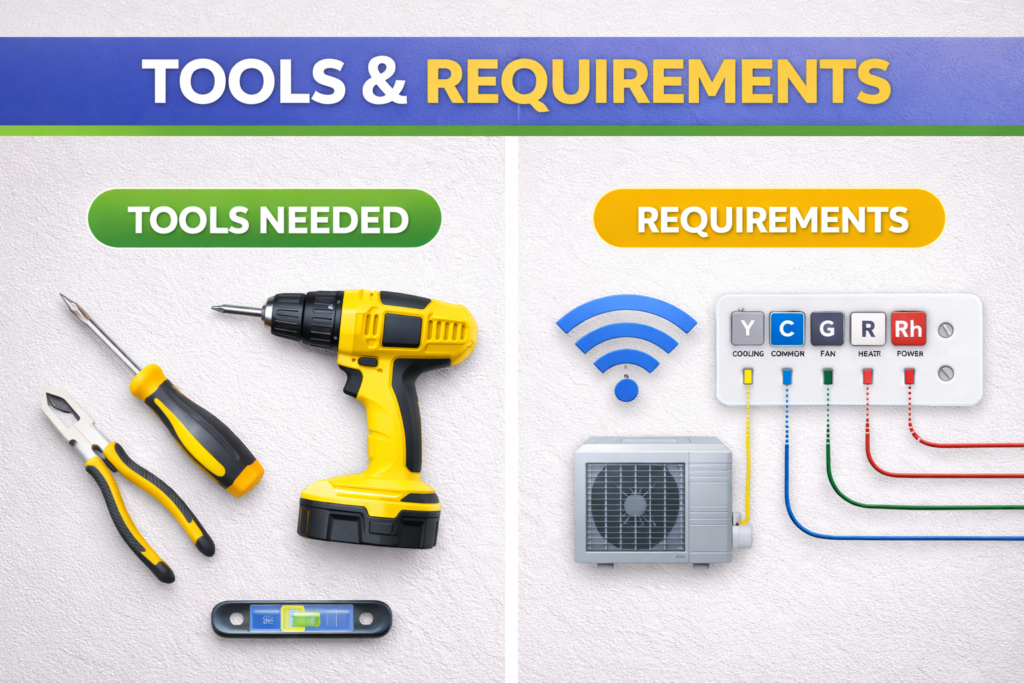
Prior to beginning the smart thermostat installation, prepare all the needed equipment as well as check whether you meet all the minimum requirements for installation. Preparing everything beforehand will help to install the smart thermostat quickly and effectively.
Essential Tools:
- Screwdriver set: both flathead and Phillip’s screwdrivers that will help you take off the old thermostat and put in the new one
- Drill with bits: optional but useful when installing the thermostat as the screw holes may not coincide
- Level: to mount the smart thermostat straight
- Smartphone or tablet: to start up the smart thermostat and connect it to Wi-Fi
System Requirements:
- Reliable Wi-Fi connection: Your smart thermostat needs consistent internet access for remote control and updates
- Compatible HVAC system: most contemporary heating systems are compatible with the smart thermostats
- C-wire connection: it is not necessary to have C-wire installed, but it helps to ensure perfect working conditions
The C-wire issue requires extra attention since it is the most frequently encountered problem when installing the device. The C-wire ensures that your thermostat gets its 24 volts of power and functions consistently, even when it does not heat or cool your place. It should be noted that there are some thermostats that do not require a C-wire since they use their own batteries or power management systems; however, the presence of the C-wire guarantees flawless work.
It turns out that most houses that were built after 1990 have already got the C-wire, although it was not connected to the existing thermostat.
Check Compatibility Before Installation
Compatibility of your HVAC system is important before you install a smart thermostat. Smart thermostats work best with low-voltage (24V) systems that are common in central air conditioning systems used in houses. On the other hand, smart thermostats do not work with high-voltage HVAC systems like electric baseboard heaters.
It’s important to check the type of wiring on your current thermostat. Low-voltage systems will have terminals R, W, Y, G, and C, whereas high-voltage systems will have thick wiring and will be labeled L1 or L2.
Smart thermostats are compatible with:
- Single and Multi-Stage HVAC Systems
- Heat pumps
- Gas, oil, and electric furnaces
- Central air conditioning
- tain Radiant Heating Systems
Make sure that your HVAC system is compatible with the thermostat before you buy it. Most of the time, most companies offer online compatibility checkers on their websites, which will help you determine whether or not a certain model is compatible with your system. Models.
Before Installation check thermostat compatibility
Understanding Thermostat Wiring (VERY IMPORTANT)
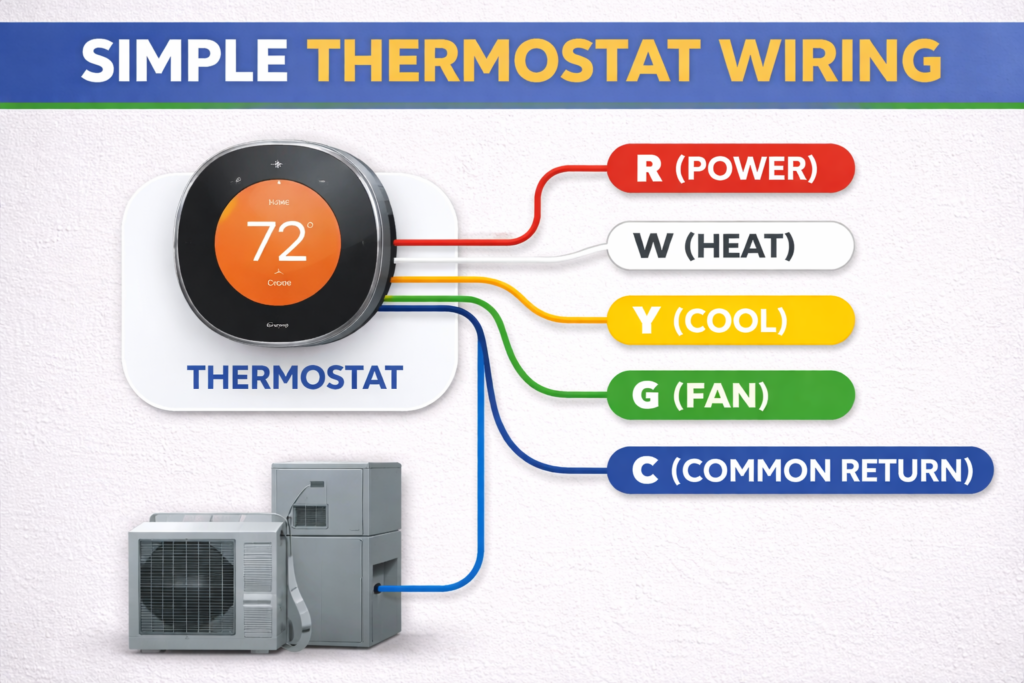
Knowing the wiring in your thermostat is key to installing it properly. Your wires are important to the operation of your heating and air conditioning system; you may cause harm to your system by connecting wires incorrectly. Take time to get familiar with your wires before installation.
Common Wire Labels and Functions:
| Terminal | Function | Correct Wire Color |
|---|---|---|
| R / Rc / Rh | Power | 🔴 Red |
| C | Common | 🔵 Blue or Black |
| W | Heat | ⚪ White |
| Y | Cooling | 🟡 Yellow |
| G | Fan | 🟢 Green |
⚠️ Rule # (VERY IMPORTANT)- Wire Color at Both Ends Should Match the Terminal Label
R Wire (Red – Power): This is your power wire and carries 24-volt power from the transformer of your HVAC system. Some systems have Rh (Heating) and Rc (Cooling) wires, whereas in some, there is just an R wire but with a jumper.
W Wire (White – Heat): This controls your heating system. Whenever the call is made for heat, it will send power through this wire and turn on your furnace or heating system. In multi-stage heating systems, you can find wires W1 and W2.
Y Wire (Yellow – Cooling): This activates your air conditioning system. Similar to heating, in multi-stage cooling, you can find Y1 and Y2 wires.
G Wire (Green – Fan): This is the independent wire to control your fan without controlling your heating and cooling operations.
C Wire (Blue or Black – Common): This creates a return path for the 24-volt power and completes the electrical circuit. It is very important in smart thermostats which require constant power supply.
Some other wires that you may come across are O or B wires (orange or blue), which are used in heat pumps to regulate the reversing valve. Auxiliary heating wires are used for those systems that have an additional heating source.
Wire counts and colors can differ from one setup to another. However, the main thing is to understand the role of every wire depending on its terminal.
Safety Note: Always turn off power to your HVAC system before working with these wires. Even though they carry only 24 volts, incorrect connections can damage expensive equipment.
Step-by-Step Smart Thermostat Installation
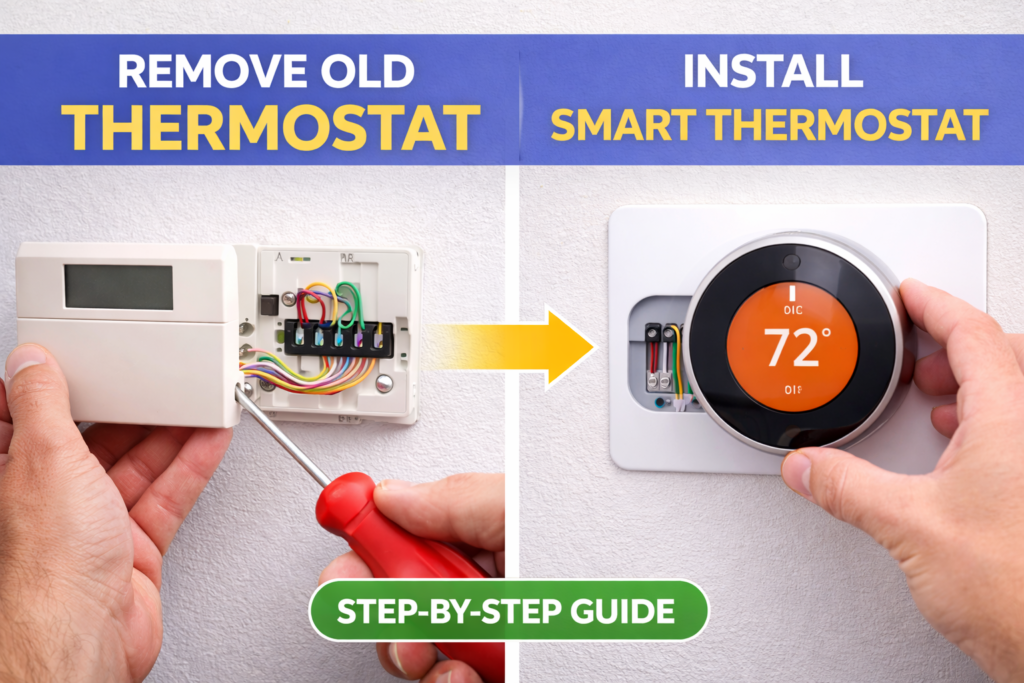
The following comprehensive installation process will be useful in installing the new smart thermostat in place of the old one.
Step 1: Turn Off Power
Before engaging in the installation process, it is vital to ensure the safety of yourself. Hence, before doing anything else, turn off power from your HVAC system through the circuit breaker. The breakers may be marked with labels such as “HVAC,” “Furnace,” “Heat,” or “AC” and hence should be turned off.
If your heating system has its power switch located by the furnace, make sure that it is switched off as well. Some people turn off power using the main disconnect switch located in the furnace. In case your wires carry 24 volts, there should be no problem as far as your safety goes; however, this step will save you from any short circuit caused accidentally during installation.
Wait for some time before proceeding, and take a picture of your existing thermostat’s display settings.
Step 2: Remove Old Thermostat
Start by taking out the front cover or faceplate of the old thermostat. Some thermostats will have a cover that can simply be pulled off while others might have tabs or screws securing it to the body.
Now you’ll see the mounting base secured to your wall and the wires being connected to different terminals. It is advisable to take a little time to look at how the current system has been installed and whether there are any problems.
Loosen the mounting base and pull it off from the wall. In most cases, mounting bases are mounted using two screws but in some other cases, there might be a few more points. Care should be taken while doing so because dropping of the base may damage the wires.
Having taken off the base, you’ll now have access to all the wires of the thermostat. You should take care not to allow any wire that has come loose to fall back into the hole on the wall.
Step 3: Take Photo & Label Wires
This step cannot be emphasized enough. Take some good photographs of the wiring arrangement before you remove any wires. These photos may prove useful in case you require them for future troubleshooting purposes.
Take photographs first and then label each wire according to the terminal letter to which it was attached on your old thermostat. All smart thermostats come with labels that you can use to label wires; otherwise, masking tape and a pen can serve the purpose equally well.
Be extra careful when labeling the wires especially those that are jumper wires. In some cases, thermostats have jumpers from R to Rc terminals or other arrangements that have to be replicated with your new thermostat. Take all precautions while labeling the wires.
If you come across some unlabeled or unused wires behind your old thermostat, take a note of their colors and placement. You may find your C-wire required by your smart thermostat among these wires.
Step 4: Install New Mounting Plate
Align the mounting plate of the new thermostat against the wall using your previous screw holes, where applicable. Ensure that the mounting plate is straight using a level since an unlevel thermostat will be very obvious and might even affect the readability of the display.
In case your new mounting plate does not match the location of your previous screw holes, you will have to make new holes for your mounting plate. You will mark the spots on your wall where you will make holes, and then drill those holes depending on your wall material. Drywall needs normal drywall anchors, but other walls may use other anchors.
Insert your labeled wires through the hole in the middle of the mounting plate before screwing in your mounting plate onto the wall. This ensures that you do not pinch any wire when fitting your mounting plate.
Step 5: Connect Wires
This is the most vital part of the installation process. Refer to your photographs and wire labels when connecting wires to the respective terminals on your thermostat’s base. R goes to R, W goes to W, Y goes to Y, and so forth.
Remove about 1/4 inch of insulation from each wire end to get a fresh copper wire. Insert each wire in the respective terminals, using the required method for your thermostat type. Some types use screw terminals that should be screwed down, while some other types use push-in connections.
Make sure to properly connect your C-wire if you have one. C-wire is vital for reliable smart thermostat performance. Connect any unused C-wire from your old thermostat to the C terminal on your new smart thermostat.
Make sure that all connections match your references and wiring diagram of the thermostat. Improper connection can ruin your heating system and even lead to malfunctioning. Tug on each wire to check if they are properly connected.
Step 6: Attach Thermostat
Once the wires are all secured properly, make sure that you carefully push back the extra wire into the wall hole without disconnecting any terminals. Make sure that the thermostat is aligned properly on top of the mounting plate.
The installation process for the mounting of the smart thermostat to the mounting plate depends upon the specific thermostat model. It can be installed either by using snaps or through screws. Make sure that the thermostat sits flat on the mounting plate without any tilt or gap.
In case if your smart thermostat operates on batteries, make sure that the batteries are inserted into the thermostat as per the manufacturer’s instructions.
Step 7: Restore Power
Once you have safely installed your new thermostat and have connected everything, you can turn power back into your HVAC system by turning the circuit breaker on again and flipping any other switch that you have turned off while installing the device.
Go back to the thermostat and look for any signs of activity. Normally, most smart thermostats will show you some kind of message or blinking lights upon receiving power. However, if you see nothing after a moment or two, do not be alarmed – some thermostats require some time to boot up.
In case your new thermostat does not turn on, make sure that everything is properly wired and that the circuit breaker is switched on correctly. Some circuit breakers may require you to turn them off completely before switching them on.
Step 8: Setup via Mobile App
Once your thermostat is powered on, download the manufacturer’s mobile app on your smartphone. Popular apps include the Honeywell Home app, Ecobee app, or Google Home app, depending on your thermostat model.
Create an account if you don’t already have one, then follow the app’s guided setup process. This typically involves connecting your thermostat to your home’s Wi-Fi network by entering your network password and following the prompts.
During setup, you’ll configure basic settings like your home’s location, HVAC system type, and initial temperature preferences. Take time to explore the app’s features and settings to customize your thermostat’s behavior to match your preferences.
Test basic functionality by adjusting the temperature setting through the app and verifying that your heating or cooling system responds appropriately. This confirms that both the wiring and software setup are working correctly.
Installing Without a C-Wire
Most houses built many years ago do not have C-wire installation, but that should not stop you from installing a smart thermostat because a C-wire or a common wire supplies 24 volts of power to your thermostat. Smart thermostats without C-wires will use something called “power stealing,” where the power will be obtained through another wire even when the heating or cooling system is inactive.
However, power stealing is not recommended since it might result in short-cycling or lack of enough power to connect to the Wi-Fi or even shutting down the entire system.
Solutions for C-Wire Installation:
The most efficient way to deal with the problem is by using the C-wire adapter or power extender kit. Such devices usually come together with smart thermostats, although you may purchase them separately and plug into your HVAC system’s control board to receive enough power for your thermostat.
Ecobee supplies the Power Extender Kit (PEK) together with most of their smart thermostats. The PEK should be installed near the control board of your furnace and deliver enough C-wire power with the help of already-existing wires.
If you are willing to go a little further and want the C-wire installed, you may try the option of running new thermostat cables with the required C-wire included.
You may also try to use the 24-volt transformer to establish a C-wire connection, but you will need to know some details about electricity. You should contact a professional HVAC technician to get advice concerning your particular case.
Common Installation Mistakes
Some of the common installation mistakes to avoid can help you to save time, money, and frustration. The following tips will ensure your installation goes well the first time.
Miswiring is the most common mistake. If you connect wires too quickly or misread wire labels, it may cause incorrect connections that will not allow your device to work properly. Double-check all connections with your photos references and wiring diagram provided by the manufacturer.
Failure to Turn Off Power seems to be a good way to save time, but it is quite risky. Even a 24-volt system can produce sparks that may damage electronic components of your smart thermostat.
If Skipping Compatibility Check becomes your case, then frustration will come when you find out your system is not compatible with your selected thermostat. Sometimes, the incompatible installation might be functional at first, but after some time, there will be issues with your heating and cooling system.
Improper Mounting gives you an ugly and unprofessional look of your thermostat, and you might experience connection errors in the future due to improper mounting.
Other common mistakes include cramming the wires into the terminals, not following the manufacturer’s installation instructions, and failing to test the system prior to completing the process.
Troubleshooting Problems
Despite thorough installation, there might arise some issues that require troubleshooting. Luckily, most of these are quite easy to solve without professional assistance.
Thermostat Not Turning On often relates to power supply troubles. See that all circuit breakers are turned on and all wire connections are done. In case of C-wire availability, make sure it’s properly connected. For battery-powered thermostats, check whether batteries are installed right and have enough power.
Wi-Fi Connection Problems will not allow connecting to the app and operating your unit remotely. Make sure your Wi-Fi is functioning and you’re using the right password. There are some thermostats that have issues connecting to Wi-Fi that uses special symbols or has a poor signal strength in the place where thermostat is located.
Heating/Cooling Not Working usually means wiring trouble. Make sure that heating and cooling wires are attached to the right terminals. Check that the power switch for your HVAC system is on and that filters aren’t clogged.
Quick Fixes:
- Reset your thermostat by unplugging it from the mounting plate for half a minute
- Reset your WiFi router in case of connection issues
- Inspect wiring in case you experience abnormal heating or cooling cycles
- Confirm that location access is allowed on your smartphone application if geofencing is not working
Almost all manufacturers provide phone support and troubleshooting resources specifically for their products. Do not be afraid to call customer support in case the troubleshooting above did not help.
DIY vs Professional Installation
Most homeowners are able to install smart thermostats themselves; however, there are specific circumstances where calling on professional help may be necessary. Knowing when to do the job yourself and when not to will ensure saving of both time and money.
DIY Installation is Ideal When:
- You have standard low voltage wiring in your existing thermostat
- You have basic tools knowledge and can perform some electric work
- You have standard HVAC system with proper labeling of wiring
- You want to avoid paying for installation, which can cost between $100-$300
Do it yourself installation is more affordable and allows you to become familiar with your home systems. Smart thermostats are generally created in order to be installed by homeowners.
Professional Installation is Recommended For:
- Complicated HVAC systems which have multiple zones/stages
- HVAC systems which run on high voltage and cannot work with ordinary smart thermostats
- Cases which require running of new wires or making any changes to electrical wiring
- Homeowners who lack confidence in their ability to handle electrical installations
Professional installation guarantees correct installation procedures and comes with warranties on the installation process. HVAC professionals will also be able to find out any compatibility issues.
Smart Thermostat Setup Tips
After the installation of your smart thermostat is completed and set up, consider following these useful tips in order to make your system perform effectively.
Take advantage of scheduling capabilities that allow adjusting temperatures according to your schedule. Set low temperatures while you sleep and while being away from home. Typically, most people feel comfortable with temperatures being 7-10 degrees lower when they sleep, which will save you money on your energy bills.
Activate Eco Mode or any other energy-saving features that are available with your particular model of the thermostat. These features will optimize settings in order to save energy and ensure your comfort at the same time.
Consider setting up home automation scenarios that involve integration of your smart thermostat with other home devices such as smart lights, security cameras, and voice assistants.
Consider activating location-based settings if available. They will allow you to set up your system in order to avoid wasting energy by turning on the heater or air conditioner while being away from your home.
❓FAQs
Can I install a smart thermostat myself?
Yes, it is entirely possible to install such devices yourself, provided that you have some experience in DIY works and your heating and ventilation systems use standard low-voltage wiring. Installation usually takes from 30 minutes to an hour, depending on the model of the device.
How long does smart thermostat installation take?
Usually, it takes about 30-60 minutes to perform installation works, however, for beginners, it may take up to 2 hours.
Do I need a C-wire for my smart thermostat?
Though some smart thermostats function even without a C-wire, it is always good to have a C-wire to get full efficiency from it. In case you do not have a C-wire, there are solutions like the C-wire adapter, power extender kit, and even a new thermostat wire.
Which smart thermostat is easiest to install?
Though some smart thermostats function even without a C-wire, it is always good to have a C-wire to get full efficiency from it. In case you do not have a C-wire, there are solutions like the C-wire adapter, power extender kit, and even a new thermostat wire.
What if my wiring doesn’t match the standard configuration?
In case of any special wiring configuration, it is best to get it evaluated by a professional. You should take some photographs of the configuration before proceeding.
🔗Related Articles
- Amazon Smart Thermostat Review & Setup Guide (2026)
- Best Smart Thermostats without C Wire (2026 Guide)
- Smart Thermostat Not Turning On? 12 Proven Fixes That Work Instantly (2026 Guide)
- Honeywell Smart Thermostat Review: Shocking Truth – Is It worth It? (2026)
- Sensi Smart Thermostat Review (Budget Pick?) – Honest 2026 Guide
- Best Smart Thermostat Under $150 USA (2026 Guide)
🚀Conclusion
Getting a smart thermostat is a very good idea to help you gain better control of your HVAC system. If done with the proper care and adequate preparations, it would take you less than one hour to install it.
If you want to successfully get rid of your previous thermostat and connect your new one to the internet, just follow all of the guidelines described above. Take your time while doing this procedure to avoid making mistakes.
Pingback: Smart Thermostat Not Turning On? 12 Proven Fixes That Work Instantly (2026 Guide)